SpringBoot 配置
# SpringBoot 配置
# 通过 properties 配置
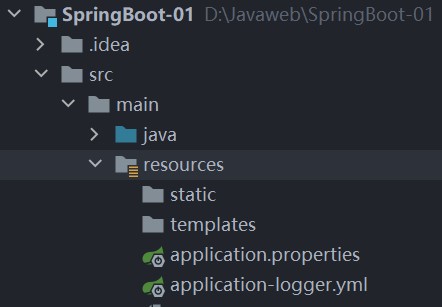
SpringBoot 可以通过 application.properties 文件进行配置(配置文件名必须是 application-xxx,例如 application-test.properties, application-dev.properties)。
以下是 start.aliyun.com 提供的模板:
Tips
如果同一个项目有多个 properties,可以通过 spring.profiles.active=logger 引用,如果引用的文件和被引用的文件有相同的部分,以被引用的文件为主,其中 logger 就是上面提到的 application-xxx.properties 中的 xxx。
# 应用名称
spring.application.name=demo
# 应用服务 WEB 访问端口
server.port=8080
#下面这些内容是为了让MyBatis映射
#指定Mybatis的Mapper文件
mybatis.mapper-locations=classpath:mappers/*xml
#指定Mybatis的实体目录
mybatis.type-aliases-package=com.example.demo.mybatis.entity
# 数据库驱动:
spring.datasource.driver-class-name=com.mysql.cj.jdbc.Driver
# 数据源名称
spring.datasource.name=defaultDataSource
# 数据库连接地址
spring.datasource.url=jdbc:mysql://localhost:3306/blue?serverTimezone=UTC
# 数据库用户名&密码:
spring.datasource.username=***
spring.datasource.password=***
# THYMELEAF (ThymeleafAutoConfiguration)
# 开启模板缓存(默认值: true )
spring.thymeleaf.cache=true
# 检查模板是否存在,然后再呈现
spring.thymeleaf.check-template=true
# 检查模板位置是否正确(默认值 :true )
spring.thymeleaf.check-template-location=true
#Content-Type 的值(默认值: text/html )
spring.thymeleaf.content-type=text/html
# 开启 MVC Thymeleaf 视图解析(默认值: true )
spring.thymeleaf.enabled=true
# 模板编码
spring.thymeleaf.encoding=UTF-8
# 要被排除在解析之外的视图名称列表,⽤逗号分隔
spring.thymeleaf.excluded-view-names=
# 要运⽤于模板之上的模板模式。另⻅ StandardTemplate-ModeHandlers( 默认值: HTML5)
spring.thymeleaf.mode=HTML5
# 在构建 URL 时添加到视图名称前的前缀(默认值: classpath:/templates/ )
spring.thymeleaf.prefix=classpath:/templates/
# 在构建 URL 时添加到视图名称后的后缀(默认值: .html )
spring.thymeleaf.suffix=.html

spring.profiles.active=logger
2
3
4
5
6
7
8
9
10
11
12
13
14
15
16
17
18
19
20
21
22
23
24
25
26
27
28
29
30
31
32
33
34
35
36
37
38
39
40
41
# 通过 properties 给属性赋值
Note
为属性赋值的 properties 最好不使用 application 这个前缀命名,springboot 对 application 前缀的 properties 文件强制使用 ISO 编码。
实体类代码:
通过 @PropertySource 注解的 value 属性指定要使用的 properties 文件,encoding 属性指定编码,使用 utf-8 防止中文乱码。
@Component
@Data
@NoArgsConstructor
@AllArgsConstructor
@PropertySource(value = "classpath:my.properties",encoding = "UTF-8")
public class Student {

    @Value("${student.id}")
    private int id;

    @Value("${student.name}")
    private String name;

    // 对list赋值以下两种写法都可以
//    @Value("${student.hobbies}")
    @Value("#{'${student.hobbies}'.split(',')}")
    private List<Object> hobbies;

    // map的赋值方法
    @Value("#{${student.grade}}")
    private Map<String,Integer> grade;

    // 复杂类型的赋值方法
    @Value("#{teacher}")
    private Teacher teacher;
}
2
3
4
5
6
7
8
9
10
11
12
13
14
15
16
17
18
19
20
21
22
23
24
25
26
properties 文件内容:
teacher.id=9
teacher.name=zzl
teacher.sex=w
teacher.age=111

student.id=10
student.name=demo
student.hobbies=code,music
student.grade={"math":60,"eng":11}
2
3
4
5
6
7
8
9
# 通过 YAML 配置
YAML 语法格式大体如下,具有较强的层次性:
server:
  port: 9900
spring:
  datasource:
    username:
2
3
4
5
注意
在项目中存在 properties 的情况下,SpringBoot 优先使用 properties 配置文件。
# 通过 YAML 给属性赋值
YAML 配置如下:
teacher:
  id: 1
  name: abc
  sex: 男
  age: 20

student:
  id: 1
  name: zzl
  hobbies:
    - code
    - music
  grade: {math: 59,eng: 59}
  teacher:
    id: ${teacher.id:random.int}#冒号后为默认值
    name: ${teacher.name:zzz}
    sex: ${teacher.sex:女}
    age: ${teacher.age:99}
2
3
4
5
6
7
8
9
10
11
12
13
14
15
16
17
18
实体类只需要加入 @ConfigurationProperties(prefix = "student") 注解指定使用前缀为 student 的 yaml 配置即可。
Tips
由于 yaml 默认就是 utf-8,所以不会出现中文乱码。
使用 YAML 进行配置时,要导入依赖,不导入会存在警告:
<dependency>
    <groupId>org.springframework.boot</groupId>
    <artifactId>spring-boot-configuration-processor</artifactId>
    <optional>true</optional>
</dependency>
2
3
4
5
# JSR-303 校验
依赖:
<dependency>
    <groupId>org.springframework.boot</groupId>
    <artifactId>spring-boot-starter-validation</artifactId>
</dependency>
2
3
4
使用:
- 在要开启校验的实体类上添加:
@Validated注解。 - 在要进行限制的属性上添加指定注解。
value 用于指定要限制的值,message 用于替换默认的报错信息:
@Min(value = 1,message = "爪巴")
private int id;
private String name;
private String sex;
private int age;
}
2
3
4
5
6
其余各限制类型如下:

# 多环境配置及配置文件位置
配置文件的可选位置:
注意
配置文件命名仍然要为:application-xxx.yml(properties)。
file:./config:此位置就是在项目根目录下创建一个 config 文件夹(文件夹名字必须为 config ),在 config 文件夹中创建配置文件(config 文件夹与 src 同级)。

file:./:此位置就是在根目录下直接创建配置文件,配置文件与 src 文件夹同级。

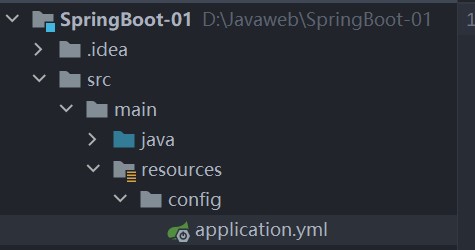
classpath:/config/:此位置就是在 resources 目录下创建 config 文件夹并在其中创建配置文件。

classpath:/:此位置就是 resources 目录。

各位置配置文件的优先级顺序
file:./config > file:./ > classpath:/config/ > classpath:/。
多环境的配置:
使用 properties:
创建多个 application-xxx.properties。
在 application.properties(默认主配置文件)中添加:
#application-logger.properties
spring.profiles.active=logger
1
2使用 YAML:
yaml 通过
---分割不同的环境,所以一个配置文件可以有多个环境,最上面为主环境,主环境可以通过spring.profiles.active指定要使用的环境,其他环境通过spring.config.active.on-profile为自己起名字。server: port: 5555 spring: profiles: active: dev --- server: port: 6666 spring: config: activate: on-profile: test --- server: port: 7777 spring: config: activate: on-profile: dev1
2
3
4
5
6
7
8
9
10
11
12
13
14
15
16
17
18
19
20