Redux
# Redux
# Redux 简介
Redux 是一个使用 action 事件来管理和更新应用状态的工具,通过集中存储的方式对整个应用中的状态进行管理,确保状态以可预测的方式更新。Redux 可以帮助管理全局状态,可以更容易理解状态何时、何地、为什么以及如何被更新。
# State 管理
从一个小的 React 组件开始:
const App:FC = () => {
  const [count, setCount] = useState(0);
  return (
    <>
      <p>{count}</p>
      <button onClick={() => setCount(count+1)}>incr</button>
    </>
  )
}
2
3
4
5
6
7
8
9
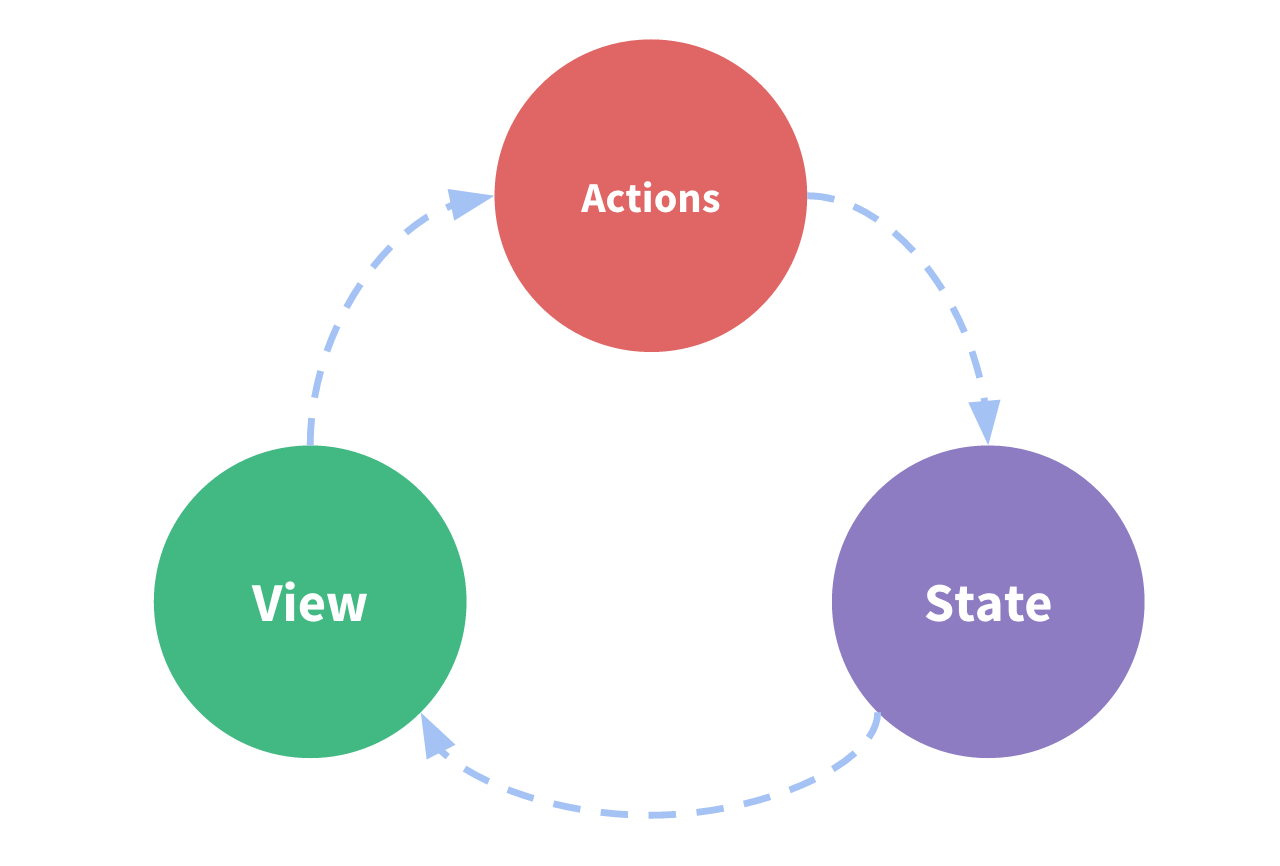
上面的组件中包含下面的部分:
- state:驱动组件的真实数据。
- view:基于当前状态的视图描述。
- actions:根据用户输入在应用程序中发生的事件,触发状态更新。
上面组件的工作流程可以用下面的步骤概括:
- 用 state 来描述应用程序的状态。
- 基于 state 来渲染 view。
- 当发生事件时,state 根据发生的事情进行更新,生成新的 state。
- 基于新的 state 渲染 view。
上面的流程就是单项数据流。
但是,如果有多个组件需要共享 state 时,事情会变的很复杂,尤其是当这些组件位于应用中的不同部分时,当然,这可以通过状态提升来解决,但是父组件需要维护大量的状态。为了解决这个问题,可以从组件中提取 state 并放入组件之外的另一个集中的位置,这样任何组件就能访问 state 或者触发 action 而无论它们在组件树的哪里。
# 不可变性
Mutable 意为“可以改变的”,而 immutable 意为“不可改变的”。
JavaScript 中的对象和数组都是可以改变的,如果创建一个对象,那么可以修改对象的属性;如果创建一个数组,那么可以修改数组内的元素。内存中还是原来对象或者数组的引用,但是里面的内容变化了。如果想要以不可变的方式更新,那么就必须先复制原来的对象或者数组,然后用这个复制结果更新。JavaScript 中的展开运算符可以实现对象或数组的拷贝。
Redux 期望所有的状态更新都使用不可变的方式。这样具有以下优势:
- 引用比较的简便性:如果状态对象不可变,那么就可以简单的通过比较对象和数组的引用来判断状态是否已经改变了,可以避免深度比较。
- 撤销、重做更容易实现:由于使用不可变的方式更新状态,所以可以轻松实现撤销、重做或者状态的时间旅行,通过 Redux 开发者插件可以查看、修改、穿梭过去的状态。
# 术语
Action:
action 是一个具有 type 字段的普通的 JavaScript 对象,action 可以被视为描述应用程序中发生了什么的事件,type 字段是一个字符串,给这个 action 定义一个描述性的名字。action 对象也可以有其他字段,其中包含有关发生的事情的附加信息,按照惯例此信息放在 payload 字段中,以下是一个示例 action:
const incrAction = {
  type: 'count/add',
  payload: 1,
}
2
3
4
Reducer:
reducer 是一个函数,接收当前的 state 和一个 action 对象,必要时决定如何更新状态并返回新状态。(state, action) => newState。可以将 reducer 视为一个事件监听器,它根据接收到的 action 类型处理事件。
Reducer 必须符合以下规则:
- 仅使用 state 和 action 计算新的状态值。
- 禁止直接修改 state,必须通过不可变方式更新。
- 禁止任何的异步逻辑、依赖随机值或者会导致副作用的代码。
Reducer 的执行内容通常是:检查当前 action 的 type 是否应该被处理,如果需要处理那么以不可变形式返回新的 state,否则返回之前的 state。
Dispatch:
更新 state 唯一的方法是调用 store.dispatch() 并传入一个 action 对象,store 将执行所有 reducer 函数并计算出更新后的 state,调用 getState() 可以获取新 state。
Selector:
随着状态的增多,可能会有很多地方需要读取 state 中的同一个字段,可以使用 selector 封装这个过程,避免重复逻辑。
下面是结合 Redux 后组件状态的维护流程:
# Redux Toolkit
Redux Toolkit 是一个开箱即用的 Redux 开发工具集,封装了配置 store、定义 reducer、不可变的更新逻辑、立即创建整个状态的切片,不需要手动编写任何 action creator 或者 action type,还自带了一些常用的 Redux 插件。
Redux 过于精简,需要很多的配置,使用 Redux Toolkit 可以简化代码。
# 示例:计数器
下面编写一个计数器示例,首先是不使用 Redux 的情况:
const Count: FC = () => {
  const [value, setValue] = useState(0);
  const [step, setStep] = useState(1);
  return (
    <div>
      <button onClick={() => setValue(value+1)}>+</button>
      <span>{value}</span>
      <button onClick={() => setValue(value-1)}>-</button>
      <br/>
      <input value={step} onChange={(e) => {setStep(parseInt(e.target.value))}}/>
      <button onClick={() => {setValue(value+step)}}>add by step</button>
      <button onClick={() => {setTimeout(() => {setValue(value+step)}, 1000)}}>add async</button>
    </div>
  )
}
2
3
4
5
6
7
8
9
10
11
12
13
14
15
接下来将这个例子改造成使用 Redux,首先安装依赖:
yarn add redux @reduxjs/toolkit react-redux
yarn add -D @types/react-redux @types/redux
2
# 编写 Redux Store
Redux Toolkit 提供了 Redux Slice,这是单个 Reducer 逻辑和 action 的集合,用来将根 Redux 对象拆分成多个部分。下面定义一个 CounterSlice 用来完成计数器的功能:
import { createSlice, PayloadAction } from "@reduxjs/toolkit";
import { Dispatch } from "react";

export type counterState = {
  value: number;
}

export type counterIncByStepAction = PayloadAction<{step: number}>;

type counterReducer = {
  incr: (state: counterState) => void;
  desc: (state: counterState) => void;
  incrByStep: (state: counterState, action: counterIncByStepAction) => void;
}

export const counterSlice = createSlice<counterState, counterReducer, 'counter'>({
  initialState: {
    value: 0,
  },
  name: "counter",
  reducers: {
    incr: (state) => {
      state.value ++;
    },
    desc: state => {
      state.value--;
    },
    incrByStep: (state, action) => {
      state.value += action.payload.step;
    }
  }
})

export default counterSlice.reducer;

export const {incr, incrByStep, desc} = counterSlice.actions;

export const incrAsync = (step: number) => (dispatch: Dispatch<counterIncByStepAction>) => {
  setTimeout(() => {
    dispatch(incrByStep({step: step}));
  }, 1000);
}

export const selectCount = ({counter}: {counter: counterState}) => {
  return counter.value;
};
2
3
4
5
6
7
8
9
10
11
12
13
14
15
16
17
18
19
20
21
22
23
24
25
26
27
28
29
30
31
32
33
34
35
36
37
38
39
40
41
42
43
44
45
46
使用 createSlice 方法创建一个 Redux Slice,首先需要指定一个 state 的初始值,这里将 state 初始值置为一个包含 value 字段的对象,然后需要一个 name,因为 action 是一个带有 type 字符串字段的对象,createSlice 方法会根据 name 值和 reducers 中方法的名字来自动生成 action,例如:
export const {incr, incrByStep, desc} = counterSlice.actions;
// {type: 'counter/incr', payload: undefined}
console.log(incr())
2
3
上面的 reducers 中并没有对 state 进行不可变式更新,而是直接操作的字段,这是因为 Redux Toolkit 使用了 immer (opens new window) 这个库,immer 检测到 draft state 改变时会基于这个改变去创建一个新的不可变的 state。
selectCount 就是之前提到的 Selector,这个函数接收一个参数,这个参数就是根 state,由于这里我们使用了 Redux Slice 将根 state 切分为多个部分,所以 counterState 将会作为这个参数的其中一个字段,这个字段的字段名取决于在组装 Redux Store 时为当前 Slice 指定的名字。
通过之前的内容我们知道,如果向改变 state,那么需要通过 dispatch 并传入 action 来完成,所以上面的 incrAsync 方法中有一个 dispatch 入参,这个dispatch 类型声明如下:type Dispatch<A> = (value: A) => void;。
接下来将这个 Slice 组装为 Redux Store:
import { configureStore } from "@reduxjs/toolkit";
import counterReducer, { counterState } from './count.ts';

const store = configureStore<{x: counterState}>({
  reducer: {
    x: counterReducer,
  }
})

export default store;
2
3
4
5
6
7
8
9
10
这里使用 Redux Toolkit 中的 configureStore 方法来完成,这个方法接收一个配置对象,这里我们将之前定义的 counterSlice 赋值给 x 字段,这样的话在状态树中的 x 字段上就有了 counterSlice 对象了,这也是在 Slice 中 Selector 入参的字段名的依据。
之前在介绍 reducer 时我们说 reducer 不能包含任何的异步逻辑,如果需要异步的话,我们需要使用 thunk。thunk 是一种特定类型的 Redux 函数,可以包含异步逻辑,Thunk 由两个函数编写:
- 一个内部 thunk 函数,以 dispatch 和 getState 作为参数。
- 外部创建者函数,创建并返回 thunk 函数。
使用 thunk 需要在创建 Redux Store 时使用 redux-thunk 中间件,Redux Toolkit 封装了这个过程。然后我们就可以将 thunk 传给 dispatch 方法了。
# 编写计数器组件
接下来修改 Count 组件:
const Count: FC = () => {
  const count = useSelector<{x: counterState}, number>(selectCount);
  const dispatch = useDispatch<Dispatch<counterIncByStepAction | PayloadAction>>();
  const [step, setStep] = useState(1);
  return (
    <div>
      <button onClick={() => {dispatch(incr())}}>+</button>
      <span>{count}</span>
      <button onClick={() => {dispatch(desc())}}>-</button>
      <br/>
      <input value={step} onChange={(e) => setStep(parseInt(e.target.value))}/>
      <br/>
      <button onClick={() => {dispatch(incrByStep({step}))}}>add by step</button>
      <button onClick={() => {incrAsync(step)(dispatch)}}>add async</button>
    </div>
  )
}
2
3
4
5
6
7
8
9
10
11
12
13
14
15
16
17
上面的组件中,展示用的 count 值我们使用 useSelector 方法并传入在 counterSlice 中定义的 Selector,useSelector 会将 state 作为入参调用我们的 Selector 并返回 Selector 的返回值。
接下来,所有对 count 的修改都通过 dispatch 来进行,这里通过 useDispatch 方法获取 dispatch,这里有两种 action:带有 step 字段的 action 和空 action。
最后,在事件处理函数中使用 dispatch 并传入由 action creator 构造的响应 action 即可实现对状态的修改。
# provide store
在完成上面的内容之后,还需要在用到 Store 状态管理的地方像 React Router 来提供一个 store provider:
function App() {
  return (
    <Provider store={store}>
      <Count/>
    </Provider>
  )
}
2
3
4
5
6
7
# 示例:文章管理
接下来,我们来制作一个小型文章管理应用,这个应用能够展示、修改、添加文章,页面直接使用 Antd,首先我们来编写一个 Redux Slice 并组装一个 store:
// slice
import {createSlice, PayloadAction} from "@reduxjs/toolkit";

export type Article = {
  id: string;
  title: string;
  content: string;
}

type ArticleState = Array<Article>

const initialArticles: Array<Article> = [
  {
    id: '1',
    title: 'First Post!',
    content: 'Hello!',
  },
  {
    id: '2',
    title: 'Second Post',
    content: 'More text',
  }
];

interface upsertPayload {
  id?: string;
  title: string;
  content: string;
}

type ArticleReducer =  {
  create: (state: ArticleState, action: PayloadAction<upsertPayload>) => void;
  update: (state: ArticleState, action: PayloadAction<upsertPayload>) => void;
}

const articleSlice = createSlice<ArticleState, ArticleReducer, 'article'>({
  name: 'article',
  initialState: initialArticles,
  reducers: {
    create(state, action) {
      state.push({
        id: `${state.length+1}`,
        content: action.payload.content,
        title: action.payload.title,
      });
    },
    update(state, action) {
      if (!action.payload.id) {
        return;
      }
      state = state.map((a) => {
        if (a.id === action.payload.id) {
          a.title = action.payload.title
          a.content = action.payload.content
        }
        return a;
      })
    }
  }
})

export default articleSlice.reducer;

export const {
  create,
  update,
} = articleSlice.actions;

export const selectArticles = ({article}: {article: ArticleState}) => {
  return article
}

export const selectArticle = (id: string) => ({article}: {article: ArticleState}) =>{
  return article.find((a) => {return a.id === id})
}
// store
const store = configureStore({
  reducer: {
    article: article,
  }
})
export default store;
export type ArticleDispatch = typeof store.dispatch;
2
3
4
5
6
7
8
9
10
11
12
13
14
15
16
17
18
19
20
21
22
23
24
25
26
27
28
29
30
31
32
33
34
35
36
37
38
39
40
41
42
43
44
45
46
47
48
49
50
51
52
53
54
55
56
57
58
59
60
61
62
63
64
65
66
67
68
69
70
71
72
73
74
75
76
77
78
79
80
81
82
83
接着,来编写创建文章的页面:
// Create.tsx
type formType = {
  title: string;
  content: string;
}

const Create: FC = () => {
  const dispatch = useDispatch();
  const [form] = Form.useForm<formType>();
  const [sender, holder] = message.useMessage();
  const onSubmit = ({title, content}: formType) => {
    dispatch(create({
      title,
      content
    }));
    form.resetFields();
    sender.success('ok')
  };
  return (
    <>
      {holder}
      <Form onFinish={onSubmit} form={form}>
        <Form.Item name="title" label={'标题'} rules={[{required: true}]}>
          <Input/>
        </Form.Item>
        <Form.Item name="content" label={'内容'} rules={[{required: true}]}>
          <Input/>
        </Form.Item>
        <Form.Item>
          <Button type={'primary'} htmlType={'submit'}>Submit</Button>
        </Form.Item>
      </Form>
    </>
  )
}
2
3
4
5
6
7
8
9
10
11
12
13
14
15
16
17
18
19
20
21
22
23
24
25
26
27
28
29
30
31
32
33
34
35
上面是一个简单的表单,输入标题和内容后点击提交,调用 dispatch 发出 action,然后触发 Redux 的 state 更新。
然后是文章列表页面:
// List.tsx
const List: FC = () => {
  const articles = useSelector(selectArticles);
  return (
    <AList dataSource={articles} renderItem={renderItem} rowKey={(item) => item.id}/>
  )
}

const renderItem = (article: Article) => {
  return (
    <AList.Item>
      <AList.Item.Meta
        title={<Link to={`view/${article.id}`}>{article.title}</Link>}
        description={article.content}
      />
    </AList.Item>
  )
}
2
3
4
5
6
7
8
9
10
11
12
13
14
15
16
17
18
这里使用了 selector 来获取当前 Redux 中的文章列表,每个文章的标题是一个 Link 组件,跳转至下面的文章详情页面:
const View: FC = () => {
  const params = useParams<{id: string}>();
  const article = useSelector(selectArticle(params.id ? params.id : ''));
  const [isEditing, setIsEditing] = useState(false);
  const [title, setTitle] = useState(article ? article.title : '');
  const [content, setContent] = useState(article? article.content : '');
  const dispatch = useDispatch();
  if (!article){
    return (
      <Empty/>
    )
  }
  return (
    <Card
      title={
      isEditing ? (
        <Input value={title} onChange={(e) => setTitle(e.target.value)}/>
      ) : article.title
      }
      extra={(
        <Space>
          <Button type={'link'} onClick={() => {
            setIsEditing(!isEditing);
          }}>{
            isEditing ? 'cancel' : 'edit'
          }</Button>
          <Link to={'..'}>back</Link>
        </Space>
      )}
    >
      {
        isEditing ? (
          <Input.TextArea
            showCount
            maxLength={100}
            value={content}
            onChange={(e) => {setContent(e.target.value)}}
          />
        ) : article.content
      }
      {
        isEditing ? <Button onClick={() => {
          dispatch(update({
            id: article?.id,
            title,
            content,
          }));
          setIsEditing(false);
        }}>Submit</Button> : undefined
      }
    </Card>
  )
}
2
3
4
5
6
7
8
9
10
11
12
13
14
15
16
17
18
19
20
21
22
23
24
25
26
27
28
29
30
31
32
33
34
35
36
37
38
39
40
41
42
43
44
45
46
47
48
49
50
51
52
53
View 组件复杂一些,这个组件首先获取路由参数中的 id 并调用 useSelector 获取 Redux 中对应的文章,如果文章获取不到就返回一个空页面。同时这个详情页面允许编辑,编辑和查看的状态通过 isEditing 这个布尔值来区分,点击按钮来回切换这个值,并使用两个局部 state 来保存编辑过程中的文章标题和内容,最后,使用 dispatch 来创建一个文章。
最后是路由配置和应用入口的内容:
// router/index.tsx
const router = createHashRouter([{
  path: '/',
  element: <App/>,
  children: [
    {
      path: 'create',
      element: <Create/>,
    },
    {
      element: <List/>,
      index: true,
    },
    {
      element: <View/>,
      path: 'view/:id'
    }
  ]
}])
// App.tsx
const Extra: FC = () => {
  const isCreate = useLocation().pathname === '/create';
  let to = 'create';
  if (isCreate) {
    to = '/';
  }
  return (
    <Space>
      <Link to={to}>{isCreate ? 'list' : 'create'}</Link>
    </Space>
  )
}

const App:FC = () => {

  return (
    <Card
      title={'Articles'}
      extra={<Extra/>}
    >
      <Outlet/>
    </Card>
  )
}
// main.tsx
ReactDOM.createRoot(document.getElementById('root')!).render(
  <React.StrictMode>
    <Provider store={store}>
      <RouterProvider router={router}/>
    </Provider>
  </React.StrictMode>,
)
2
3
4
5
6
7
8
9
10
11
12
13
14
15
16
17
18
19
20
21
22
23
24
25
26
27
28
29
30
31
32
33
34
35
36
37
38
39
40
41
42
43
44
45
46
47
48
49
50
51
52
总结
到这里,这个文章应用包含了以下内容:
- 通过 reducer 来更新 state。
- 通过 dispatch 来在组件中触发 state 的更新。
- 通过 selector 来获取数据,如果 selector 需要自定义参数,那么在定义 selector 时要使用函数柯里化。
- 应用内的任意组件都能访问 Redux 管理的 state。
# 异步逻辑与数据请求
上面的例子中,数据仍然是只在这个应用中流转,现在我们来编写一个 http server,通过 api 调用的方式来获取数据。
这里使用 koa 来编写 http 服务,主要逻辑如下:
import ObjectID from "bson-objectid";
import * as Koa from 'koa';
import * as Router from 'koa-router';
import * as bodyParser from 'koa-bodyparser';

type Article = {
  id: string;
  title: string;
  content: string;
}

const app = new Koa();
app.use(bodyParser());
app.use(async (ctx, next) => {
  try {
    await next();
    if (!ctx.body) {
      ctx.body = {};
    }
  } catch (e) {
    ctx.response.status = 400;
    ctx.response.body = (e as Error).message;
  }
})

const router = new Router({
  prefix: '/articles',
});

type UpsertRequest = {
  title: string;
  content: string;
}
let articles: Array<Article> = [];
router.get('/', (ctx) => {
  ctx.body = articles;
});

router.post('/', (ctx) => {
  if (!ctx.request.body) {
    throw new Error('missing body');
  }
  const req: UpsertRequest = ctx.request.body as UpsertRequest;
  const newArticle: Article = {
    title: req.title,
    content: req.content,
    id: ObjectID().toHexString(),
  };
  articles.push(newArticle);
});

router.put('/:id', (ctx) => {
  const id = ctx.params['id'];
  if (!ctx.request.body) {
    throw new Error('missing body');
  }
  const req: UpsertRequest = ctx.request.body as UpsertRequest;
  let articleFound = false;
  articles = articles.map((a) => {
    if (a.id === id) {
      articleFound = true;
      a.title = req.title;
      a.content = req.content;
    }
    return a
  });
  if (!articleFound) {
    throw new Error('article not found')
  }
})
app.use(router.routes()).use(router.allowedMethods());
app.listen(8080, '0.0.0.0');
2
3
4
5
6
7
8
9
10
11
12
13
14
15
16
17
18
19
20
21
22
23
24
25
26
27
28
29
30
31
32
33
34
35
36
37
38
39
40
41
42
43
44
45
46
47
48
49
50
51
52
53
54
55
56
57
58
59
60
61
62
63
64
65
66
67
68
69
70
71
72
通过上面的内容可知,reducer 不能包含异步逻辑,但是在 reducer 被调用之前,要先调用 dispatch,可以扩展 dispatch,也就是在调用 dispatch 之前发起异步逻辑,Redux 中的中间件为此提供了支持,最常用的异步中间件是 redux-thunk,Redux Toolkit 中的 configureStore 方法会默认开启此中间件,在加入 thunk 中间件之后,数据的流转就像下面这样:
现在,将之前的创建、修改、获取文章改为使用 thunk 异步执行 Redux Toolkit 提供了 createAsyncThunk 方法来创建 asyncThunk,下面是对三个接口调用的封装:
const axiosInstance = axios.create({
  baseURL: '/v1/articles/'
})

export const update = createAsyncThunk<void, upsertPayload>('articles/update', async ({id, content, title}, {dispatch}) => {
  if (!id) {
    throw new Error('empty id')
  }
  await axiosInstance.put<void, AxiosResponse<void>, upsertPayload>(`${id}`, {
    content,
    title,
  });
  dispatch(list())
});

export const create = createAsyncThunk<void, upsertPayload, {dispatch: ArticleDispatch}>('articles/create', async ({content, title}, {dispatch}) => {
  await axiosInstance.post<void, AxiosResponse<void>, upsertPayload>('', {
    content,
    title,
  })
  dispatch(list())
})

export const list = createAsyncThunk<Array<Article>, void>('articles/list', async () => {
  const resp = await axiosInstance.get<Array<Article>>('')
  return resp.data;
})
2
3
4
5
6
7
8
9
10
11
12
13
14
15
16
17
18
19
20
21
22
23
24
25
26
27
这个方法接收三个泛型类型,第一个类型是里面包裹的函数的返回类型,第二个类型是参数类型,这个参数可以在内部函数的入参中访问到,第三个参数是一个配置对象,这里只配置了 dispatch 的类型是 articleStore 的 dispatch 类型。
为了在创建、更新文章之后能够及时更新 state,在 update 和 create 之后都再次 dispatch list,为了接收 asyncThunk 的返回值并更新到 state 中,修改 slice:
const articleSlice = createSlice<ArticleState, {}, 'article'>({
  name: 'article',
  initialState: initialArticles,
  extraReducers: (builder) => {
    builder.addCase(list.fulfilled, (_, action) => {
      return action.payload
    })
  },
  reducers: {},
})
2
3
4
5
6
7
8
9
10
extraReducers 选项是一个接收名为 builder 的参数的函数,builder 对象提供了一些方法,可以定义额外的 reducer 来响应各种 case,可以通过下面三种方式定义 case:
addCase(actionCreator, reducer):定义一个 case reducer 来响应一个 action。addMatcher(matcher, reducer):定义一个 case reducer,如果 matcher 返回为 true 那么 reducer 将会被执行。addDefaultCase(reducer):定义一个 case reducer,如果没有其他 case reducer 被执行,那么这个 reducer 会执行。
Tips
如果多个 case 都匹配,那么它们将按照定义的顺序运行。
上面的例子中使用了 addCase,下面是使用 addMatcher 的写法:
// isFulfilled 是 Redux Toolkit 提供的内置方法
extraReducers: (builder) => {
  builder.addMatcher(isFulfilled(list), (_, action) => {
    return action.payload
  })
},
2
3
4
5
6
# vite 反向代理设置
在上面的例子中,如果使用 vite 管理项目,那么需要修改 vite.config.ts 来设置反向代理:
export default defineConfig({
  plugins: [react()],
  server: {
    proxy: {
      '^/v1/.*': {
        target: 'http://127.0.0.1:8080',
        rewrite: path => path.replace(/^\/v1/, '')
      }
    }
  }
})
2
3
4
5
6
7
8
9
10
11
# 在组件中执行异步
现在,修改创建文章的组件,使用异步 dispatch:
const dispatch = useDispatch<ArticleDispatch>();
const [form] = Form.useForm<formType>();
const [sender, holder] = message.useMessage();
const onSubmit = async ({title, content}: formType) => {
  await dispatch(create({
    title,
    content
  }));
  form.resetFields();
  sender.success('ok')
};
2
3
4
5
6
7
8
9
10
11
由于在 createAsyncThunk 中抛出错误时,这个错误会被内部捕获处理,所以上面的代码中即使 create 中抛出异常 await 之后的逻辑也会执行,要想处理异步结果,有以下两种方法。
第一种方法是将 dispatch 的结果展开为一个 Promise,对这个 Promise 做 await 可以获得异常:
const onSubmit = async ({title, content}: formType) => {
  try {
    await dispatch(create({
      title,
      content
    })).unwrap();
    form.resetFields();
    sender.success('ok');
  } catch (e) {
    sender.error((e as Error).message)
  }
}
2
3
4
5
6
7
8
9
10
11
12
第二种方法时校验 dispatch 的结果是不是 rejected 或者 fulfilled 状态:
const onSubmit = async ({title, content}: formType) => {
  const resp = await dispatch(create({
    title,
    content
  }))
  if (create.fulfilled.match(resp)) {
    form.resetFields();
    sender.success('ok')
  } else if (create.rejected.match(resp)) {
    sender.error(resp.error.message);
  }
};
2
3
4
5
6
7
8
9
10
11
12
# 性能与数据范式化
# 缓存 Selector
修改之前的 selectArticles,加入一句日志输出:
export const selectArticles = ({article}: {article: ArticleState}) => {
  console.log('selectArticles')
  return article
}
2
3
4
现在只要重新渲染使用到这个 Selector 的组件,这个日志就会被输出,这说明这个 Selector 被执行了多次。如果一个 Selector 中逻辑比较复杂、耗时,那么这样无意义的重复调用会影响性能。reselect 库提供了一个 createSelector 方法,此方法可以缓存 selector 的结果,此函数通常接受一组输入选择器和一个转换函数作为参数。输入选择器返回的数据将作为参数传递给转换函数,后者返回基于这些输入的派生数据。例如:
export const selectArticlesWithDep = createSelector(
  [selectArticles],
  (articles) => {
    console.log('selectArticlesWithDep')
    return articles;
  },
)
2
3
4
5
6
7
替换用到 selectArticles 的地方,然后来回切换页面,selector 将不会在依赖值不改变的情况下发生调用。
# 范式化数据
在上面的例子中,selector 中主要是获取全部和根据 id 获取数据,如果数组很长,那么根据 id 查找的速度可能会受到影响,可能需要遍历大量元素才能找到对应的内容,因此最好有一种根据 id 直接查找单个元素的方法而不需要检查所有其他项,这个过程被称为“范式化”。
范式化 state 是指:
- state 中每个特定数据只有一个副本,没有重复。
- 已范式化的数据保存在查找表中,项目 id 是键,项目本身是值。
- 也可能有一个特定项用于保存所有的 id 数组。
Redux Toolkit 提供了 createEntityAdapter 方法来创建范式化 state,现在将之前的 ArticleSlice 替换为使用范式化 state,首先创建范式化 state:
const articleAdapter = createEntityAdapter<Article>({
  selectId: (a) => a.id,
})
2
3
createEntityAdapter 接收一个配置项,可以配置使用那个字段作为 id,还有一个 sortComparer 字段,这个字段是一个函数,工作方式与 array.sort() 相同,接收两个参数,用来排序,例如按照标题长度排序:
const articleAdapter = createEntityAdapter<Article>({
  selectId: (a) => a.id,
  sortComparer: (a, b) => a.title.length - b.title.length
})
2
3
4
接着来替换初始 state,adapter 的 getInitialState() 方法返回一个空的范式化 state。:
const articleSlice = createSlice({
  name: 'article',
  initialState: articleAdapter.getInitialState(),
  // ......
})
2
3
4
5
然后来替换 extraReducers,将 listArticles 的结果更新到 state 中:
extraReducers: (builder) => {
  builder.addMatcher(isFulfilled(list), (state, action) => {
    articleAdapter.setMany(state, action.payload);
  })
},
2
3
4
5
articleAdapter 上有增加、删除和更新方法,这里使用 set 是完全替换,也可以使用 updateMany 部分更新,更新时需要使用 change 来匹配需要更新的项目,就像下面这样:
extraReducers: (builder) => {
  builder.addMatcher(isFulfilled(list), (state, action) => {
    articleAdapter.setMany(state, action.payload);
    const updater: ReadonlyArray<Update<Article>> = action.payload.map((a) => ({
      id: a.id,
      changes: {
        title: a.title,
        content: a.content,
      }
    }))
    articleAdapter.updateMany(state, updater)
  })
},
2
3
4
5
6
7
8
9
10
11
12
13
adapter 中也有封装好的 Selector 方法,通过调用 getSelectors() 方法可以获取内置的 Selectors,这个函数接收一个参数,此参数是一个函数,返回当前 Slice 在 Redux 状态树中的 state,下面的代码导出了 Selector:
export const {
  selectIds,
  selectAll,
  selectTotal,
  selectById,
} = articleAdapter.getSelectors<StateType>(({article}) => {
  console.log(article)
  return article
})
2
3
4
5
6
7
8
9
如果使用 TypeScript,那么 getSelectors 的泛型可以通过导出 store 的 state 获取:
const store = configureStore({
  reducer: {
    article: article,
  }
})
store.dispatch(list());
export default store;

export type StateType = ReturnType<typeof store.getState>;
2
3
4
5
6
7
8
9
最后修改组件中对 Selector 的使用:
// List.tsx
const List: FC = () => {
  const articles = useSelector(selectAll);
  return (
    <AList dataSource={articles} renderItem={renderItem} rowKey={(item) => item.id}/>
  )
}
// View.tsx
const View: FC = () => {
  const params = useParams<{id: string}>();
  const article = useSelector((state: StateType) => selectById(state, params.id || ''));
  // other codes ......
2
3
4
5
6
7
8
9
10
11
12
# RTK 查询
在之前的内容中,异步更新 state 需要我们自行处理 fulfilled、rejected 等情况,并且每个方法都包含构造请求、发送请求的步骤,同时如果希望增加缓存功能也会比较复杂。为了简化与服务器的交互和状态的维护,可以使用 RTK Query(Redux Toolkit Query)来实现。
使用 RTK Query 主要包含以下几个步骤:
- 通过
createApi()创建 API 切片。 - 定义服务端点(endpoint)。
- 使用自动生成的钩子。
- 发起请求。
根据上面的步骤,现在开始改造之前的文章管理中的内容,不再依赖 ArticleSlice,所有的数据都从服务端来,首先来创建一个 API 切片:
import { BaseQueryFn, createApi, FetchArgs } from "@reduxjs/toolkit/query/react";
import axios from "axios";
import { Article } from "./article.ts";

interface UpsertArg {
  id?: string;
  content: string;
  title: string;
}

const axiosInstance = axios.create({
  baseURL: '/v1/articles',
})

const axiosBaseQuery: BaseQueryFn<FetchArgs> = (args) => {
  return axiosInstance.request({
    method: args.method,
    params: args.params,
    data: args.body,
    url: args.url
  })
}

const api = createApi({
  reducerPath: 'articlesAPI',
  baseQuery: axiosBaseQuery,
  endpoints: (builder) => {
    return {
      fetchArticles: builder.query<Array<Article>, void>({
        query: () => ({
          url: '/',
        }),
      }),
      createArticles: builder.mutation<void, UpsertArg>({
        query: (arg): FetchArgs => ({
          url: '/',
          method: 'POST',
          body: arg,
        }),
      }),
      updateArticle: builder.mutation<void, UpsertArg>({
        query: (arg: UpsertArg): FetchArgs => ({
          url: `/${arg.id}`,
          method: 'PUT',
          body: arg,
        }),
      }),
      deleteArticle: builder.mutation<void, string>({
        query: (id): FetchArgs => ({
          url: `/${id}`,
          method: 'DELETE',
        }),
      }),
      getArticle: builder.query<Article, string>({
        query: (id) => ({
          url: `/${id}`,
          method: 'GET',
        }),
      })
    }
  },
})
2
3
4
5
6
7
8
9
10
11
12
13
14
15
16
17
18
19
20
21
22
23
24
25
26
27
28
29
30
31
32
33
34
35
36
37
38
39
40
41
42
43
44
45
46
47
48
49
50
51
52
53
54
55
56
57
58
59
60
61
62
解释一下上面的主要内容:
- 通过
createApi()可以创建一个 API 切片,这个方法接收一个配置对象,配置对象中 reducerPath 指的是当这个 API 切片在configureStore()配置到 Redux Store 之后对应的 Reducer 的名字。 - baseQuery 是一个基础查询函数,这里用 axios 实现,RTK 本身也提供了
fetchBaseQuery方法来创建 baseQuery 对象,这个方法是基于 Fetch API 的。自行构造 baseQuery 要注意参数类型,上面可以看到,自建的 axios baseQuery 中使用了 FetchArgs 这个泛型类型,这个类型就是 baseQuery 函数的第一个入参的类型,这个类型应该和下方 endpoints 中 query 返回的类型一致,在实际发出请求时,传入 baseQuery 的入参就是 endpoints query 的返回值。 - endpoints 定义了与服务器交互的一组操作,可以是 query 用来获取数据并缓存,也可以是 mutations 用来更新服务器数据,endpoints 是使用回调函数构造的,该函数接收 builder 对象,要创建 query 或者 mutation 可以使用
builder.query()或builder.mutation()。 builder.query()和builder.mutation()的两个泛型分别表示返回类型和入参类型,同时由于在 baseQuery 中将入参定义为 FetchArgs 类型,所以 endpoints 中所有 query 都应该是返回 FetchArgs 对象的函数。
接着就可以导出自动生成的 Hooks 了:
export default api;

export const {
  useCreateArticlesMutation,
  useUpdateArticleMutation,
  useDeleteArticleMutation,
  useFetchArticlesQuery,
  useLazyFetchArticlesQuery,
  useGetArticleQuery,
  useLazyGetArticleQuery,
} = api;
2
3
4
5
6
7
8
9
10
11
Warning
要使用 Hooks 的话 createApi() 要使用 "@reduxjs/toolkit/query/react" 包中的,如果使用 TypeScript,只有用这个包里的 createApi() 才会有对应 Hook 的类型提示。
然后配置 store,这可以集中管理状态并且可以实现 RTK Query 内置的自动缓存、请求去重、生命周期管理等。将 API Slice 的 cache reducer 配置到 Store 中,同时 API Slice 还会生成需要添加到 Store 的自定义中间件,需要一并添加:
const store = configureStore({
  reducer: {
    [api.reducerPath]: api.reducer,
  },
  middleware: getDefaultMiddleware => getDefaultMiddleware().concat(api.middleware),
})
export default store;
2
3
4
5
6
7
然后修改之前的所有组件,使用 API Slice Hooks 替换 dispatch 和 useSelector:
// Create.tsx
const Create: FC = () => {
  const [form] = Form.useForm<formType>();
  const [sender, holder] = message.useMessage();
  const [create, {isLoading}] = useCreateArticlesMutation();
  const onSubmit = async ({title, content}: formType) => {
    try {
      await create({
        title,
        content,
      }).unwrap()
      form.resetFields();
      sender.success('ok');
    } catch (e) {
      sender.error((e as Error).message)
    }
  }

  return (
    <>
      {holder}
      <Spin spinning={isLoading}>
        <Form onFinish={onSubmit} form={form}>
          <Form.Item name="title" label={'标题'} rules={[{required: true}]}>
            <Input/>
          </Form.Item>
          <Form.Item name="content" label={'内容'} rules={[{required: true}]}>
            <Input/>
          </Form.Item>
          <Form.Item>
            <Button type={'primary'} htmlType={'submit'}>Submit</Button>
          </Form.Item>
        </Form>
      </Spin>
    </>
  )
}
// View.tsx
const View: FC = () => {
  const params = useParams<{id: string}>();
  const query = useGetArticleQuery(params.id || '');
  const [update, {isLoading}] = useUpdateArticleMutation();
  const article = query.currentData;
  const [isEditing, setIsEditing] = useState(false);
  const [title, setTitle] = useState('');
  const [content, setContent] = useState('');
  const [sender, holder] = message.useMessage();
  useEffect(() => {
    if (!article) {
      return
    }
    setTitle(article.title);
    setContent(article.content);
  }, [article])
  if (!article && query.isError){
    return (
      <Result
        status={'error'}
        title={'oop!'}
        extra={<Link to={'..'}><Button>back</Button></Link>}
      />
    )
  }
  return (
    <Spin spinning={isLoading || query.isFetching}>
      {holder}
      {
        query.isSuccess && article ? (
          <Card
            title={
              isEditing ? (
                <Input value={title} onChange={(e) => setTitle(e.target.value)}/>
              ) : article.title
            }
            extra={(
              <Space>
                <Button type={'link'} onClick={() => {
                  setIsEditing(!isEditing);
                }}>{
                  isEditing ? 'cancel' : 'edit'
                }</Button>
                <Link to={'..'}>back</Link>
              </Space>
            )}
          >
            {
              isEditing ? (
                <Input.TextArea
                  showCount
                  maxLength={100}
                  value={content}
                  onChange={(e) => {setContent(e.target.value)}}
                />
              ) : article.content
            }
            {
              isEditing ? <Button onClick={async () => {
                await update({
                  id: article.id,
                  content,
                  title,
                }).unwrap();
                setIsEditing(false);
                sender.success('ok')
              }}>Submit</Button> : undefined
            }
          </Card>
        ) : undefined
      }
    </Spin>
  )
}
// List.tsx
const List: FC = () => {
  const resp = useFetchArticlesQuery();
  return (
    <Spin spinning={resp.isFetching}>
      {
        resp.isSuccess ?
          <AList dataSource={resp.currentData} renderItem={renderItem} rowKey={(item) => item.id}/> :
          <Empty/>
      }
    </Spin>
  )
}

const renderItem = (article: Article) => {
  const [deleteFunc] = useDeleteArticleMutation();
  return (
    <AList.Item
      extra={<Button danger onClick={() => {
        deleteFunc(article.id);
      }}>delete</Button>}
    >
      <AList.Item.Meta
        title={<Link to={`view/${article.id}`}>{article.title}</Link>}
        description={article.content}
      />
    </AList.Item>
  )
}
2
3
4
5
6
7
8
9
10
11
12
13
14
15
16
17
18
19
20
21
22
23
24
25
26
27
28
29
30
31
32
33
34
35
36
37
38
39
40
41
42
43
44
45
46
47
48
49
50
51
52
53
54
55
56
57
58
59
60
61
62
63
64
65
66
67
68
69
70
71
72
73
74
75
76
77
78
79
80
81
82
83
84
85
86
87
88
89
90
91
92
93
94
95
96
97
98
99
100
101
102
103
104
105
106
107
108
109
110
111
112
113
114
115
116
117
118
119
120
121
122
123
124
125
126
127
128
129
130
131
132
133
134
135
136
137
138
139
140
141
Query Hook 会返回一个包含多个字段的对象,包括:
- data 或 currentData:响应内容,未收到响应之前是 undefined。
- isLoading:布尔值,表示此 Hook 是不是在发出第一次请求,如果后续改变参数再请求此字段仍然为 false。
- isFetching:布尔值,表示当前是否正在发出请求。
- isSuccess:布尔值,表示当前 Hook 请求是否已成功并有可用的缓存数据,此字段类似 isLoading,在后续调用时保持为 true。
- isError:布尔值,表示请求是否出错。
- error:一个序列化后的错误对象。
Mutation Hook 返回的是一个数组,第一个元素是一个函数,可以视为是一个 asyncThunk 函数,也可以使用 unwrap 来处理错误,调用此函数可以发起 mutation 请求,第二个参数是一个包含多个字段的对象,包含 isLoading 等状态。
# 刷新缓存
在完成后,首先创建一个文章,然后返回 List,可以发现页面并没有显示刚刚创建的内容,如果重复这个过程可以在控制台看到,在切换回 List 的时候并没有发生网络请求,也就是说创建后切换回 List 使用的是缓存的数据,为了让 RTK Query 刷新数据,可以在 List 中增加一个按钮,点击按钮刷新数据:
const List: FC = () => {
  const resp = useFetchArticlesQuery();
  return (
    <Spin spinning={resp.isFetching}>
      {
        resp.isSuccess ?
          (
            <Card title={<Button onClick={() => {resp.refetch()}}>refresh</Button>}>
              <AList dataSource={resp.currentData} renderItem={renderItem} rowKey={(item) => item.id}/>
            </Card>
          ) :
          <Empty/>
      }
    </Spin>
  )
}
const renderItem = (article: Article) => {
  const [deleteFunc] = useDeleteArticleMutation();
  return (
    <AList.Item
      extra={<Button danger onClick={() => {
        deleteFunc(article.id);
      }}>delete</Button>}
    >
      <AList.Item.Meta
        title={<Link to={`view/${article.id}`}>{article.title}</Link>}
        description={article.content}
      />
    </AList.Item>
  )
}
2
3
4
5
6
7
8
9
10
11
12
13
14
15
16
17
18
19
20
21
22
23
24
25
26
27
28
29
30
31
Query Hook 提供了一个 refetch() 方法来强制重新获取数据,现在点击此按钮会抛出一个错误:React has detected a change in the order of Hooks called by List. This will lead to bugs and errors if not fixed,这是因为 Query Hook 的 isSuccess 在第一次请求成功之后就一直是 true 了,在调用 refetch() 重新发起请求之后此字段仍然是 true,所以会渲染 List 组件,但是此时请求还没结束,List 中内容为空,没有 List Item,所以 renderItem 中的 useDeleteArticleMutation 这个 Hook 不会有任何执行,当请求就绪后再次渲染组件,此时 List 中存在内容,所以会调用 useDeleteArticleMutation,React 中不允许条件调用 Hooks,每次渲染组件时调用的 Hooks 数量应该相同,所以上面的代码会报错,为了解决这个问题,使用 !isFetching 来替代 isSuccess:
const List: FC = () => {
  const resp = useFetchArticlesQuery();
  return (
    <Spin spinning={resp.isFetching}>
      {
        !resp.isFetching ?
          (
            <Card title={<Button onClick={() => {resp.refetch()}}>refresh</Button>}>
              <AList dataSource={resp.currentData} renderItem={renderItem} rowKey={(item) => item.id}/>
            </Card>
          ) :
          <Empty/>
      }
    </Spin>
  )
}
2
3
4
5
6
7
8
9
10
11
12
13
14
15
16
当然这种手动刷新的机制在很多时候不太合适,而且对使用者来说也很繁琐,RTK Query 提供了基于标签的自动刷新机制,在 createApi() 中使用 tagTypes字段定义一系列标签,然后在 Query 中的 providesTags 定义需要重新刷新这个 Query 的一系列标签,在 Mutation 中的 invalidatesTags 定义这个 Mutation 会触发哪些标签导致的刷新,这样,在 Mutation 执行之后,providesTags 中包含这个 Mutation 的 invalidatesTags 中定义的标签的 Query 会被自动刷新,下面改造上面的手动刷新例子:
const api = createApi({
  // ... other codes
  tagTypes: ['Create', 'Update', 'Delete'],
  endpoints: (builder) => {
    return {
      fetchArticles: builder.query<Array<Article>, void>({
        // ... other codes
        providesTags: ['Create', 'Update', 'Delete'],
      }),
      createArticles: builder.mutation<void, UpsertArg>({
        // ... other codes
        invalidatesTags: ['Create'],
      }),
      updateArticle: builder.mutation<void, UpsertArg>({
        // ... other codes
        invalidatesTags: ['Update'],
      }),
      deleteArticle: builder.mutation<void, string>({
        // ... other codes
        invalidatesTags: ['Delete'],
      }),
      getArticle: builder.query<Article, string>({
        // ... other codes
        providesTags: ['Create', 'Update', 'Delete'],
      })
    }
  },
})
2
3
4
5
6
7
8
9
10
11
12
13
14
15
16
17
18
19
20
21
22
23
24
25
26
27
28
这样,再次创建、修改、删除文章时就会触发对应 Query 的重新加载,页面会被及时更新。
# 定时失效缓存
在上面的例子中,从文章列表中点击任意一个文章进入详情页后,控制台可以看到一次接口调用,然后回到列表页,重复进入同一个详情页面时会因为数据缓存不再去调用接口,在文章列表等待 60 秒后再次进入则会有接口调用,这是因为默认情况下数据的缓存时间是 60 秒,这个数值可以通过 keepUnusedDataFor 来设置,例如将超时时间改为 10 秒:
const api = createApi({
  reducerPath: 'articlesAPI',
  // ... other codes
  keepUnusedDataFor: 10,
})
2
3
4
5
# 失效特定的项目
在最初实现编辑功能时,编辑完成后点击提交,页面的内容仍然是编辑之前的,这是因为数据缓存导致的,现在我们使用了 providesTags 和 invalidatesTags 两个字段来实现调用更新接口后失效查询接口,但是现在仍然存在一个问题:更新某个文章的内容后会导致所有的查询丢弃缓存,但是没有被更新到的文章实际上不需要重新请求,仍然使用缓存即可,为了解决这个问题,providesTags 和 invalidatesTags 可以是一个对象数组,每个对象包含 type 字段和 id 字段,type 字段就是之前数组中的字符串,id 是数字或者字符串,二者的 id 和 type 匹配后就会失效特定的项目。
tagTypes: ['Create', 'Update', 'Delete'],
endpoints: (builder) => {
  return {
    fetchArticles: builder.query<Array<Article>, void>({
      providesTags: ['Create', 'Update', 'Delete'],
    }),
    createArticles: builder.mutation<void, UpsertArg>({
      invalidatesTags: ['Create'],
    }),
    updateArticle: builder.mutation<void, UpsertArg>({
      invalidatesTags: (_result, _error, arg) => {
        return [{
          type: 'Update',
          id: arg.id,
        }]
      }
    }),
    deleteArticle: builder.mutation<void, string>({
      invalidatesTags: (_result, _error, arg) => {
        return [
          {
            type: 'Delete',
            id: arg,
          }
        ]
      }
    }),
    getArticle: builder.query<Article, string>({
      providesTags: (result) => {
        if (result) {
          return [
            {
              type: 'Update',
              id: result.id,
            },
            {
              type: 'Delete',
              id: result.id,
            }
          ]
        }
        return [];
      }
    })
  }
},
2
3
4
5
6
7
8
9
10
11
12
13
14
15
16
17
18
19
20
21
22
23
24
25
26
27
28
29
30
31
32
33
34
35
36
37
38
39
40
41
42
43
44
45
46
现在,更新或者删除文章时只会使得特定的数据失效。
# 在非 React 应用中使用 RTK Query
在 React 应用中使用 RTK Query 会因为 Hooks 的存在变得简单,但是 Redux 是独立设计的,不依赖于 UI,因此应该在任意位置可用,API 切片中有一个 endpoints 字段,其中包含我们定义的查询,这些查询上有一个 initiate() 方法,执行此方法可以得到一个 ThunkAction,将这个 action 传给 dispatch 即可:
store.dispatch(api.endpoints.fetchArticles.initiate())
为了能够读取当前 state 的数据,同样可以使用 Selector,只不过这里的 Selector 是从 RTK Query 的缓存中读取的,也就是说下面的方法并不会发出请求,需要 dispatch endpoint:
// api.ts
export const selectArticlesResult = api.endpoints?.fetchArticles.select();

export const selectArticles = createSelector(
  [selectArticlesResult],
  (result) => result ? result.data : [],
)
// List.ts
const articles = useSelector(selectArticles);
2
3
4
5
6
7
8
9
# 注入 Endpoints
大型项目中接口的管理可能是分布在多个文件中的,为了将多个文件统一到一起,可以使用 API 切片上的 injectEndpoints() 方法:
export const {useExtendQueryQuery} = api.injectEndpoints({
  endpoints: (builder) => {
    return {
      extendQuery: builder.query<Article, string>({
        query: (id) => ({
          method: 'GET',
          url: `/${id}`
        })
      })
    }
  }
})
2
3
4
5
6
7
8
9
10
11
12
Note
injectEndpoints 会改变原来的 API 切片并返回新的切片,但是建议使用返回的新切片而不是旧切片,尽管它们是同一个对象。在使用 TypeScript 的情况下,返回的切片中才会有新的 Hooks 类型提示。
# 处理响应
如果接口返回的数据格式和组件中需要的格式不同,这时就需要进行响应数据的转换,请求接口可以定义一个 transformResponse 方法来转换返回的数据,例如:
getArticle: builder.query<Article, string>({
  // ... other codes
  transformResponse: (baseQueryReturnValue: Article, _meta, _arg) => {
    return {
      id: baseQueryReturnValue.id,
      title: `${baseQueryReturnValue.title}_trans`,
      content: `${baseQueryReturnValue.content}_trans`
    }
  }
})
2
3
4
5
6
7
8
9
10
这里只是简单的加了一个后缀,transformResponse 的第一个参数应该是服务器返回的类型,第三个参数 arg 是当前 query 的入参,在这里可以将响应对象转换为视图对象。
# 高级缓存更新
现在来为文章列表中的每个元素增加一个收藏按钮,当然 Article 类型要增加相关的定义,同时 api 接口也要支持对收藏的更新:
// API Slice
favorite: builder.mutation<void, string>({
  query: (id) => ({
    url: `/${id}/favorite`,
    method: 'POST'
  }),
  invalidatesTags: ['Update']
})
// List.tsx
const renderItem = (article: Article) => {
  const [deleteFunc] = useDeleteArticleMutation();
  const [favorite] = useFavoriteMutation();
  return (
    <AList.Item
      extra={<Button danger onClick={() => {
        deleteFunc(article.id);
      }}>delete</Button>}
    >
      <AList.Item.Meta
        title={<Link to={`view/${article.id}`}>{article.title}</Link>}
        description={article.content}
        avatar={<Rate count={1} value={article.isFavorite ? 1 : 0} onChange={() => {
          favorite(article.id);
        }}/>}
      />
    </AList.Item>
  )
}
2
3
4
5
6
7
8
9
10
11
12
13
14
15
16
17
18
19
20
21
22
23
24
25
26
27
28
现在,点击任意一个文章的收藏按钮都会改变对应文章的状态,并且因为使用了 invalidatesTags,这会使得页面整体刷新。像更改收藏状态这样的小更新其实不需要重新获取整个帖子列表,我们甚至可以只更新 Redux 中已缓存的数据来匹配服务器上的预期改动,同时,立即更新缓存数据将使得页面更快速的更新,RTK Query 允许通过请求的生命周期函数来更新某个 query 的缓存:
favorite: builder.mutation<void, string>({
  query: (id) => ({
    url: `/${id}/favorite`,
    method: 'POST'
  }),
  onQueryStarted: async (arg, {dispatch, queryFulfilled}) => {
    const action = api.util?.updateQueryData('fetchArticles', undefined, data => {
      const index = data.findIndex(a => a.id === arg);
      if (index >= 0) {
        data[index].isFavorite = !data[index].isFavorite;
      }
    })
    const result = dispatch(action);
    try {
      await queryFulfilled;
    } catch {
      result.undo();
    }
  }
})
2
3
4
5
6
7
8
9
10
11
12
13
14
15
16
17
18
19
20
RTK Query 提供了 updateQueryData() 方法,此方法可以直接更新缓存中的查询数据,第一个参数指定要更新哪个 endpoint 的缓存数据,第二个参数是入参筛选,例如如果要更新的 endpoint 存在入参,那么通过指定第二个参数可以更新指定的缓存数据,第三个参数是一个函数,入参就是缓存中的数据,可以直接操作,当然操作缓存仍然要已不可变的形式完成,不过 RTK Query 中使用了 Immer,因此可以直接修改。updateQueryData() 方法会返回一个 action,dispatch 这个方法即可实现更新 state。
onQueryStarted 是一个查询的生命周期函数,第一个参数是当前查询的入参,第二个参数是一个对象,包含多个内容,其中 dispatch 可以分发 action 来实现对状态的更改,queryFulfilled 是当前查询的一个 Promise,上面的例子中 await 这个 Promise 就是在等待调用接口成功,如果接口报错,那么取消 action 的执行。
同时,在上面的例子中我们删除了 invalidatesTags 字段,因为现在的目标是更新收藏状态不重新拉取文章列表。
# 使用懒加载
API 切片中除了普通的 Query Hooks 之外,每个 Query Hook 都有一个对应的 LazyQueryHook,这些 Hooks 可以实现懒加载而不是在组件被挂载时就执行,他们的用法类似 Mutation Hooks,例如,在 List 组件中控制挂载 3 秒后才拉取数据:
const List: FC = () => {
  const [query, {data, isFetching}] = useLazyFetchArticlesQuery()
  useEffect(() => {
    const id = setTimeout(() => {
      query()
    }, 3000)
    return () => {clearTimeout(id)}
  }, [])
  return (
    <Spin spinning={isFetching}>
      {
        !isFetching ?
          (
            <AList dataSource={data} renderItem={renderItem} rowKey={(item) => item.id}/>
          ) :
          <Empty/>
      }
    </Spin>
  )
}
2
3
4
5
6
7
8
9
10
11
12
13
14
15
16
17
18
19
20
# 不使用 Redux Toolkit 的例子
上面的文章管理中使用了 Redux Toolkit 来构建应用,下面是仅使用 Redux 的例子,不再使用 Redux Toolkit。我们同样从不使用异步接口的情况开始,首先构造一个 Article Reducer:
export type Article = {
  id: string;
  title: string;
  content: string;
  isFavorite?: boolean;
}

interface ArticlePayload {
  id?: string;
  title?: string;
  content?: string;
}

interface ArticleAction extends Action {
  type: 'articles/upsert' | 'articles/delete' | 'articles/updateFavorite',
  payload: ArticlePayload,
}

type ArticleState = Array<Article>

const articleReducer: Reducer<ArticleState, ArticleAction> = (state = [], action) => {
  switch (action.type) {
    case 'articles/upsert':
      if (action.payload.id) {
        state = state.map((a) => {
          if (a.id === action.payload.id) {
            a.title = action.payload.title || '';
            a.content = action.payload.content || '';
          }
          return a;
        })
      } else {
        const temp: Article = {
          id: new ObjectID().toHexString(),
          title: action.payload.title || '',
          content: action.payload.content || '',
        };
        state = [...state, temp];
      }
      break;
    case 'articles/delete':
      state = state.filter(a => a.id !== action.payload.id);
      break;
    case 'articles/updateFavorite':
      state = state.map(a => {
        if (a.id === action.payload.id) {
          a.isFavorite = !a.isFavorite;
        }
        return a;
      })
      break;
  }
  return state;
}

const selectAllArticles: Selector<NativeState, Array<Article>> = (state) => state.article;

const selectArticleById: (id: string) => Selector<NativeState, Article | undefined> = (id) => {
  return (state) => {
    return state.article.find((a) => a.id === id);
  }
}

export {
  selectAllArticles,
  selectArticleById,
}

export default articleReducer;
2
3
4
5
6
7
8
9
10
11
12
13
14
15
16
17
18
19
20
21
22
23
24
25
26
27
28
29
30
31
32
33
34
35
36
37
38
39
40
41
42
43
44
45
46
47
48
49
50
51
52
53
54
55
56
57
58
59
60
61
62
63
64
65
66
67
68
69
由于直接使用原生 Redux,因此 action type 的判断需要自行处理,同时由于原生 Redux 没有使用 Immer,因此不可变更新需要自行完成。同时定义了两个 Selector 用来获取数据。
接下来构造 Store 对象,为了将各个 Reducer 组合起来,需要使用 combineReducers 方法:
import {createStore, combineReducers} from 'redux';
import articleReducer from "./article.ts";

const rootReducer = combineReducers({
  article: articleReducer,
})

const nativeStore = createStore(rootReducer);

export type NativeDispatch = typeof nativeStore.dispatch;

export type NativeState =  ReturnType<typeof nativeStore.getState>;

export default nativeStore;
2
3
4
5
6
7
8
9
10
11
12
13
14
现在 Redux 已经配置好了,应用可以正常使用,但是 Redux DevTools 没有内容,我们需要将 DevTools 添加到 Enhancers 中:
import {createStore, combineReducers} from 'redux';
import { composeWithDevTools } from "redux-devtools-extension";
import articleReducer from "./article.ts";

const rootReducer = combineReducers({
  article: articleReducer,
})

const nativeStore = createStore(rootReducer, composeWithDevTools());
2
3
4
5
6
7
8
9
# subscribe
Redux 中 Store 的 subscribe() 方法可以添加一个变化监听器,每当 dispatch action 的时候就会被执行。subscribe 回调中可以执行 dispatch()。
现在来注册一个监听器,当 state 发生变化时打印日志:
const unsubscribeFn= nativeStore.subscribe(() => {
  const nowState = nativeStore.getState();
  if (!Object.is(nowState, prevState)) {
    console.log(`state changed from ${JSON.stringify(prevState)} to ${JSON.stringify(nowState)}`);
  }
  prevState = nowState;
})

export {unsubscribeFn};
2
3
4
5
6
7
8
9
现在改变 state 都会打印日志,subscribe() 方法会返回一个退订函数,调用这个函数可以取消一个订阅,例如:
<Button onClick={unsubscribeFn}>unsubscribe</Button>
# Enhancers
StoreEnhancer 是一个函数,此函数接收一个 Store Creator 的入参,返回一个新的 Creator,例如现在要使得每次调用 dispatch 的时候打印日志,可以使用下面的 StoreEnhancer 来实现:
const logEnhancer: StoreEnhancer = (creator) => {
  return (state, action) => {
    const store = creator(state, action);
    const originalDispatch = store.dispatch;
    store.dispatch = (action) => {
      console.log('Dispatching:', action);
      const result = originalDispatch(action);
      console.log('Dispatched, next state:', store.getState())
      return result
    }
    return store;
  }
}
2
3
4
5
6
7
8
9
10
11
12
13
同时,我们又希望能够继续使用 Redux DevTools,由于 createStore() 方法只接收一个 Enhancer,因此我们需要将多个 Enhancer 组合起来,需要使用 redux 中的 compose() 方法:
const enhancers = compose(composeWithDevTools(), logEnhancer);

const nativeStore = createStore(rootReducer, enhancers);
2
3
现在再发生 dispatch 后控制台会有对应的输出。
# Middleware
Enhancer 非常强大,因为它可以覆盖或者替换 Store 上的任何内容,包括 dispatch、getState 和 subscribe,但是很多时候我们只需要定制 dispatch 即可,Redux middleware 可以实现仅对 dispatch 进行自定义。
现在使用 middleware 来实现 dispatch 的日志功能,首先定义一个 middleware:
const logMiddleware: Middleware = api => next => action => {
  console.log('dispatching', action)
  const result =  next(action);
  console.log('Dispatched, next state:', api.getState())
  return result;
}
2
3
4
5
6
middleware 是一个函数,返回另一个函数,此函数入参是 dispatch,然后返回下一个函数,这个函数入参是 action,通过这样包装实现 middleware 的功能。
middleware 需要变为 Enhancer 并注入到 Store 中才会生效,使用 applyMiddleware() 方法可以将多个 middleware 连接为一个 Enhancer,然后可以加入到 Store 中:
const middleEnhancer = applyMiddleware(logMiddleware);

const enhancers = compose(composeWithDevTools(), middleEnhancer);

const nativeStore = createStore(rootReducer, enhancers);
2
3
4
5
# 异步
# 自定义异步 middleware
Redux Reducer 不能包含副作用,例如异步请求、保存文件等,但是程序中总是要有处理异步的地方,Redux middleware 就是存放这些副作用逻辑的地方,接下来开始改造上面的内容,使用自定义 middleware 支持异步并从服务器获取数据。
首先来修改一下之前 action 的类型定义:
export type ArticleAsyncFn = (dispatch: Dispatch<ArticleAction>, state: ArticleState) => Promise<void>

export interface ArticleAction extends Action {
  // ......
  payload?: ArticlePayload | ArticleAsyncFn;
}
2
3
4
5
6
现在,ArticleAction 的 payload 字段可以是一个函数了,在 middleware 中只要判断这一点就可以实现发出异步请求了,例如:
const asyncMiddleware: Middleware = ({dispatch, getState}) => next => async (action) => {
  if (typeof action.payload === 'function') {
    const fn = action.payload as ArticleAsyncFn;
    try {
      dispatch({type: 'articles/pending'})
      await fn(dispatch, getState());
    } catch (e) {
      let message = JSON.stringify(e);
      if (e instanceof Error) {
        message = e.message;
      }
      dispatch({type: 'articles/rejected', payload: {message: message}})
      throw e;
    }
  }
  return next(action)
}
2
3
4
5
6
7
8
9
10
11
12
13
14
15
16
17
这个 middleware 中首先判断 payload 是不是函数,如果是的话就调用这个函数,并且根据结果 dispatch 相关的 action。
接下来就需要定义发起异步请求的相关方法:
const fetchArticlesFn: ArticleAsyncFn = async (dispatch) => {
  const resp = await axiosInstance.get<Array<Article>>('/');
  dispatch({
    type: 'articles/resolved',
    payload: {
      articles: resp.data,
    }
  });
}

const deleteArticleFn = (id: string): ArticleAsyncFn => {
  return async (dispatch) => {
    await axiosInstance.delete<void>(`/${id}`);
    dispatch(fetchArticles())
  }
}

const upsertArticleFn = (params: UpsertRequest): ArticleAsyncFn => {
  return async (dispatch) => {
    if (params.id) {
      await axiosInstance.put(`/${params.id}`, params);
    } else {
      await axiosInstance.post<void>('/', params);
    }
    dispatch(fetchArticles())
  }
}

const updateFavoriteFn = (id: string): ArticleAsyncFn => {
  return async (dispatch) => {
    await axiosInstance.post<void>(`/${id}/favorite`);
    dispatch(fetchArticles())
  }
}
2
3
4
5
6
7
8
9
10
11
12
13
14
15
16
17
18
19
20
21
22
23
24
25
26
27
28
29
30
31
32
33
34
然后 dispatch 时传入这些函数作为 payload 即可,当然这样的方式要不断构造 action 对象,所以可以定义对应的 ActionCreator:
const fetchArticles = (): ArticleAction =>({
  type: 'articles/fetch',
  payload: fetchArticlesFn,
})

const deleteArticle = (id: string): ArticleAction =>({
  type: 'articles/delete',
  payload: deleteArticleFn(id),
})

const upsertArticle = (params: UpsertRequest): ArticleAction =>({
  type: 'articles/fetch',
  payload: upsertArticleFn(params),
})

const updateFavorite = (id: string): ArticleAction =>({
  type: 'articles/updateFavorite',
  payload: updateFavoriteFn(id),
})
2
3
4
5
6
7
8
9
10
11
12
13
14
15
16
17
18
19
这样在组件中就可以像下面这样使用了:
const onSubmit = async ({title, content}: formType) => {
  try {
    await dispatch(upsertArticle({title, content}));
  } catch (e) {
    if (e instanceof Error) {
      sender.error(e.message);
    } else {
      sender.error(JSON.stringify(e));
    }
    return;
  }
  sender.success('ok');
}
2
3
4
5
6
7
8
9
10
11
12
13
# 使用 thunk middleware
除了自定义异步 middleware 之外,还可以直接使用 thunk middleware。
安装:
yarn add redux-thunk
然后引入这个中间件:
import thunk from "redux-thunk";
const middleEnhancer = applyMiddleware(thunk);
2
引入此中间件后,dispatch 可以接受函数作为参数了,所以现在来修改之前发出请求的异步函数:
import { ThunkAction, ThunkDispatch } from "redux-thunk";
const fetchArticles: ThunkAction<Promise<void>, NativeState, void, ArticleAction> = async (dispatch) => {
  const resp = await axiosInstance.get<Array<Article>>('/');
  dispatch({
    type: 'articles/resolved',
    payload: {
      articles: resp.data,
    }
  });
}

const deleteArticle = (id: string): ThunkAction<Promise<void>, NativeState, void, ArticleAction> => {
  return async (dispatch) => {
    await axiosInstance.delete<void>(`/${id}`);
    await dispatch(fetchArticles)
  }
}

const upsertArticle = (params: UpsertRequest): ThunkAction<Promise<void>, NativeState, void, ArticleAction> => {
  return async (dispatch) => {
    if (params.id) {
      await axiosInstance.put(`/${params.id}`, params);
    } else {
      await axiosInstance.post<void>('/', params);
    }
    await dispatch(fetchArticles)
  }
}

const updateFavorite = (id: string): ThunkAction<Promise<void>, NativeState, void, ArticleAction> => {
  return async (dispatch) => {
    await axiosInstance.post<void>(`/${id}/favorite`);
    await dispatch(fetchArticles)
  }
}
2
3
4
5
6
7
8
9
10
11
12
13
14
15
16
17
18
19
20
21
22
23
24
25
26
27
28
29
30
31
32
33
34
35
这里将函数或者函数的返回值声明为 ThunkAction 类型,这个类型接收四个泛型,第一个泛型是返回类型,这里都是返回 Promise<void>,第二个泛型是 Store 中状态树的类型,第三个泛型是额外参数,这里设置为 void,第四个泛型是当前 reducer 正常的 Action 类型。
接下来,为了在 dispatch 传入函数的情况下仍然有 TypeScript 类型标注,因此需要定义一个新的 Dispatch 类型:
export type ArticleDispatch = ThunkDispatch<NativeState, void, ArticleAction>
最后,在组件中使用这些 action:
{/* other codes */}
{
  isEditing ? <Button onClick={async () => {
    await dispatch(upsertArticle({title, content, id: article?.id}))
    setIsEditing(false);
    sender.success('ok')
  }}>Submit</Button> : undefined
}
{/* other codes */}
2
3
4
5
6
7
8
9