Vue Router
# Vue Router
# 安装 VueRouter
npm install vue-router
# 使用 VueRouter
在 src 目录下创建 router 文件夹,并在其中创建 index.js:
import VueRouter from "vue-router";
import Home from "@/components/Home";
import About from "@/components/About";
import News from "@/components/News";
import Message from "@/components/Message";
import Detail from "@/components/Detail";
export default new VueRouter({
    routes: [
        {
        	//指定路径
            path:'/home',
            //对应组件
            component:Home
        },
        {
            path:'/about',
            component:About,
        }
    ]
})
2
3
4
5
6
7
8
9
10
11
12
13
14
15
16
17
18
19
20
在 main.js 中引用 VueRouter 并使用上述配置:
import Vue from 'vue'
import App from './App.vue'
import VueRouter from "vue-router";
import router from'./router'
Vue.config.productionTip = false
Vue.use(VueRouter);
new Vue({
  render: h => h(App),
  router
}).$mount('#app')
2
3
4
5
6
7
8
9
10
在 APP 组件中添加超链接:
<template>
  <div>
    <router-link active-class="active" to="/about">About</router-link>
    <router-link active-class="active" to="/home">Home</router-link>
    <div>
      <router-view></router-view>
    </div>
  </div>
</template>
2
3
4
5
6
7
8
9
通过 router-link 标签使用路由,to 属性指定要跳转的目的地,active-class 属性指定了当这个路径被触发时,这个超链接的样式,通过 router-view 标签指定链接到的组件的显示位置。
Tips
切换时销毁前一个组件 vc,嵌套时先销毁外层组件,再销毁内层组件。
# 多级路由
import VueRouter from "vue-router";
import Home from "@/components/Home";
import About from "@/components/About";
import News from "@/components/News";
import Message from "@/components/Message";
import Detail from "@/components/Detail";
export default new VueRouter({
    routes: [
        {
            path:'/home',
            component:Home,
        },
        {
            path:'/about',
            component:About,
            children:[
                {
                    path:'news',
                    component:News,
                },
                {
                    path:'message',
                    component:Message,
                    children:[
                        {
                            path:'detail',
                            component:Detail,
                        }
                    ],
                }
            ]
        }
    ]
})
2
3
4
5
6
7
8
9
10
11
12
13
14
15
16
17
18
19
20
21
22
23
24
25
26
27
28
29
30
31
32
33
34
Tips
使用 children 属性指定子路由,子路由 path 不能加斜线,router-link 的 to 属性从根路径开始写到目的子路径。
# query 参数
通过将参数拼接在 URL 中传递参数。
写法一:
<router-link :to="`/about/message/detail?id=${msg.id}&title=${msg.title}`">{{ msg.id }}-{{ msg.title }}</router-link>
通过反引号并将 to 属性改为绑定形式,使用${}取得要传递的参数。
写法二:
<router-link :to="{
            path:'/about/message/detail',
            query:{
              id:msg.id,
              title:msg.title
            }}">
          {{ msg.id }}-{{ msg.title }}
        </router-link>
2
3
4
5
6
7
8
to 属性依然是绑定方式,写成对象形式。
Tips
无论哪种写法,在目的组件中都要使用 $route.query.XXX 访问传递的参数。
# 命名路由、重定向、别名、命名视图
# 命名路由
可以在创建 Router 实例的时候,在 routes 配置中给某个路由设置名称:
routes: [
        {
            path:'/home',
            component:Home,
            name:'home'
        },
        {
            path:'/about',
            component:About,
            name:'about',
        }
    ]
2
3
4
5
6
7
8
9
10
11
12
在使用时通过绑定 to 属性并采用对象形式传递一个 name 参数指定要跳转到的路由。
# 重定向
从 /a 重定向到 /b:
const router = new VueRouter({
  routes: [
    { path: '/a', redirect: '/b' }
  ]
})
2
3
4
5
重定向到命名路由:
const router = new VueRouter({
  routes: [
    { path: '/a', redirect: { name: 'foo' }}
  ]
})
2
3
4
5
重定向到函数:
const router = new VueRouter({
  routes: [
    { path: '/a', redirect: to => {
      // 方法接收 目标路由 作为参数
      // return 重定向的 字符串路径/路径对象
    }}
  ]
})
2
3
4
5
6
7
8
# 别名
/a 的别名是 /b,意味着,当用户访问 /b 时,URL 会保持为 /b,但是路由匹配则为 /a,就像用户访问 /a 一样:
const router = new VueRouter({
  routes: [
    { path: '/a', component: A, alias: '/b' }
  ]
})
2
3
4
5
# 命名视图
你可以在界面中拥有多个单独命名的视图,而不是只有一个单独的出口。如果 router-view 没有设置名字,那么默认为 default:
<router-view class="view one"></router-view>
<router-view class="view two" name="a"></router-view>
<router-view class="view three" name="b"></router-view>
2
3
多个视图需要多个组件,路由配置中使用配置项 components:
const router = new VueRouter({
  routes: [
    {
      path: '/',
      components: {
        default: Foo,
        a: Bar,
        b: Baz
      }
    }
  ]
})
2
3
4
5
6
7
8
9
10
11
12
# params 参数(RestFul)
在 index.js 中修改:
import VueRouter from "vue-router";
import Home from "@/components/Home";
import About from "@/components/About";
import News from "@/components/News";
import Message from "@/components/Message";
import Detail from "@/components/Detail";
export default new VueRouter({
    routes: [
        {
            path:'/home',
            component:Home,
            name:'home'
        },
        {
            path:'/about',
            component:About,
            name:'about',
            children:[
                {
                    path:'news',
                    component:News,
                    name:'news'
                },
                {
                    path:'message',
                    component:Message,
                    name:'message',
                    children:[
                        {
                            path:'detail/:id/:title',
                            component:Detail,
                            name:'detail',
                        }
                    ],
                }
            ]
        }
    ]
})
2
3
4
5
6
7
8
9
10
11
12
13
14
15
16
17
18
19
20
21
22
23
24
25
26
27
28
29
30
31
32
33
34
35
36
37
38
39
在 path 属性中的路径后使用/分隔参数,:后接参数键。
传递参数:
<router-link :to="{
            name:'detail',
            params:{
              id:msg.id,
              title:msg.title
            }}">
          {{ msg.id }}-{{ msg.title }}
        </router-link>
2
3
4
5
6
7
8
使用了 params 参数后必须使用 name 而不能使用 path。
获取参数:
$route.params.id
# props 配置
# 布尔模式
在 params 基础上,修改路由配置:
{
    path:'message',
        component:Message,
            name:'message',
                children:[
                    {
                        path:'detail/:id/:title',
                        component:Detail,
                        name:'detail',
                        props:true
                    }
                ],
}
2
3
4
5
6
7
8
9
10
11
12
13
props 属性如果为 true,则使用 params 传递的参数都将变成 props 形式传递到目的地,即 route.params 将变成组件的属性,router-link 标签写法与 params 一致。
目的组件修改为:
<template>
  <div>
    <h3>Detail</h3>
    <h5>{{id}}</h5>
    <h5>{{title}}</h5>
  </div>
</template>

<script>
export default {
  name: "Detail",
  mounted() {
    console.log(this.$route)
  },
  props:['id','title']
}
</script>
2
3
4
5
6
7
8
9
10
11
12
13
14
15
16
17
# 对象模式
props 写成:
props:{id:'test',title:'test'}
此对象所有的键值对都会以 props 形式传递,当 props 是静态时是有用的,目的组件中用法与布尔模式相同。
# 函数模式
目的组件用法依然不变。
接收 params:
props(route){
    return{
        id: route.params.id,
        title: route.params.title
    }
}
2
3
4
5
6
接收 query:
props(route){
    return{
        id: route.query.id,
        title: route.query.title
    }
}
2
3
4
5
6
# router-link 的 replace 属性
浏览器的历史记录分为两种模式:push 模式和 replace 模式,push 模式是每访问一个链接,就把这个链接入栈,所以能够一直返回直到最开始的链接,replace 模式是每访问一个链接,就把这个链接替换掉上一条链接。
开启 router-link 的 replace 模式:
<router-link replace to="/about/news" active-class="active">News</router-link>
<router-link :replace="true" to="/about/message" active-class="active">Message</router-link>
2
开启 replace 模式后,后退跳转到的是最后一个不是 replace 的链接。
# 编程式路由
为其他控件实现跳转、跳转前处理数据等需要使用编程式路由。
# push 方法
用法如下,需要传递一个参数对象,参数对象与 router-link 标签 to 属性一致:
this.$router.push({
    name: 'detail',
    query: {
        id: msg.id,
        title: msg.title
    }
})
2
3
4
5
6
7
# replace 方法
传递一个参数对象,参数对象与 router-link 标签 to 属性一致:
this.$router.replace({
    name: 'detail',
    query: {
        id: msg.id,
        title: msg.title
    }
})
2
3
4
5
6
7
# back 方法
后退功能:
this.$router.back();
# forward 方法
前进功能:
this.$router.forward();
# go 方法
传递一个整数做参数,如果是正数就是前进对应的步数,负数则后退相应步数:
this.$router.go(5);
this.$router.go(-19);
2
# 缓存路由组件
使不展示的组件保持挂载不销毁。
使用 keep-alive 标签包裹 <router-view></router-view>:
<keep-alive>
    <router-view></router-view>
</keep-alive>
2
3
要缓存哪个组件,就去哪个组件的对应的 router-view 组件,即最后这个组件的展示位置两边使用 keep-alive 标签。
keep-alive 默认缓存中间的所有组件,通过 include 属性指定仅缓存其中的某几个组件。
使用 include 属性指定要缓存的组件,值为组件名,如果是多个组件,使用逗号分隔,或者使用绑定传入数组。
<keep-alive include="News,Message">
    <router-view></router-view>
</keep-alive>
<keep-alive :include="['News','Message']">
    <router-view></router-view>
</keep-alive>
2
3
4
5
6
# 两个新的生命周期钩子
# activated
组件对应的路由被激活时触发,如果不使用缓存,这个钩子不会被执行,使用缓存后,一次激活对应路由以后 mounted 不会再次调用,但这个路由激活钩子会反复调用。
Tips
这个钩子只有开启缓存后才会生效。
# deactivated
组件对应的路由失活时触发,如果不使用缓存,这个钩子不会被执行,使用缓存后,beforeDestroy 不会调用。
Tips
这个钩子只有开启缓存后才会生效。
# 路由元信息
定义路由的时候可以配置 meta 字段。
一个路由匹配到的所有路由记录会暴露为 $route 对象 (还有在导航守卫中的路由对象) 的 $route.matched 数组。因此,我们需要遍历 $route.matched 来检查路由记录中的 meta 字段。
# 路由守卫
Tips
参数或查询的改变并不会触发进入/离开的导航守卫。
导航守卫是应用在目标上的。
# 全局前置守卫
每次路由切换之前调用、初始化时被调用。
router.beforeEach((to, from, next)=>{
    if (to.meta.authRequired){
        if (localStorage.getItem('access')!=='admin'){
            alert('403 Forbidden')
        }else {
            next();
        }
    }else {
        next();
    }
});
2
3
4
5
6
7
8
9
10
11
router 是创建的 VueRouter 对象,并在需要验证的路由规则的 meta 属性中使用标识符决定是否要进行鉴权。
to: 目的地的路由对象。
from: 起点的路由对象。
next: 函数,执行效果依赖传入的参数。
next():进行下一个钩子,如果全部钩子执行完,就确认导航,达到目的地。next(false):中断当前导航,如果 URL 改变,则会重置到 from 对应的地址。next('/')或next({path:'/'}):跳转到一个不同的地址,采用对象写法可以像编程式路由中的push等方法一样传递参数等。next(error):传入 Error 实例,该导航被中断,错误被传递给router.onError()注册过的回调。
# 全局后置守卫
每次路由切换之后调用、初始化时被调用。
接收两个参数,不接收 next 函数。
router.afterEach((to,from)=>{
    //用于修改界面标题
    document.title=to.meta.title||'VueRouter';
    console.log(from);
});
2
3
4
5
上述代码用于修改页面标题,每个路由规则的 meta 属性都配置一个 title,进入不同路由显示不同标题。
# 独享路由守卫
Tips
独享路由守卫只有前置路由守卫。
接收三个参数,和全局前置守卫相同:
routes: [
    {
        path:'/home',
        component:Home,
        name:'home',
        meta:{title: 'Home'},
        beforeEnter:((to, from, next) => {

        })
    }]
2
3
4
5
6
7
8
9
10
# 组件内路由守卫
三种守卫都接收 to、from、next 三个参数。
beforeRouteEnter:在渲染该组件的对应路由被 confirm 之前(调用 next() 会导致 confirm ),不能获取组件实例 this,因为此时组件还没有被创建。
beforeRouteUpdate(2.2 新增):当前路由改变但是该组件被复用时调用,举例来说,对于使用
params动态路径传参,路径定义为 '/test/:id' 时,在 '/test/1' 和 '/test/2' 之间跳转时,由于渲染同样的组件,因此组件实例会被复用,这个钩子此时调用,可以访问组件实例对象 this。beforeRouteLeave:导航离开该组件的对应路由时调用,可以访问组件实例对象 this。
# 全局解析守卫
在 2.5.0+ 你可以用 router.beforeResolve 注册一个全局守卫。这和 router.beforeEach 类似,区别是在导航被确认之前,同时在所有组件内守卫和异步路由组件被解析之后,解析守卫就被调用。
# 完整的导航解析流程
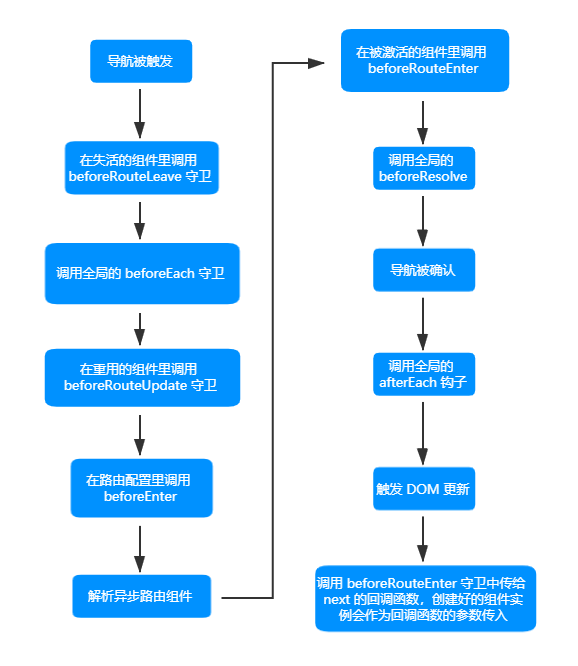
# HTML5 History 模式
vue-router 默认 hash 模式 —— 使用 URL 的 hash 来模拟一个完整的 URL,于是当 URL 改变时,页面不会重新加载。
井号 # 后面的内容就是 hash 值。
hash 值不会包含在 HTTP 请求中,即 hash 值不会发送给服务器。
切换模式:
配置 VueRouter 时除了传递 route 参数,还可以传递一个 mode 参数指定工作模式。
mode:'hash',
routes: []
2
history 模式由于会将路径发送给服务器,所以在部署时需要后端具有全路径资源匹配能力,防止 404 问题。
# 滚动行为
使用前端路由,当切换到新路由时,想要页面滚到顶部,或者是保持原先的滚动位置,就像重新加载页面那样。
当创建一个 Router 实例,提供一个 scrollBehavior 方法:
const router = new VueRouter({
  routes: [...],
  scrollBehavior (to, from, savedPosition) {
    // return 期望滚动到哪个的位置
  }
})
2
3
4
5
6
返回值示例
{ x: number, y: number }。{ selector: string, offset? : { x: number, y: number }}。
平滑滚动:
将 behavior 选项添加到 scrollBehavior 内部返回的对象中。
scrollBehavior (to, from, savedPosition) {
  if (to.hash) {
    return {
      selector: to.hash,
      behavior: 'smooth',
    }
  }
}
2
3
4
5
6
7
8
# 导航故障
router.onError(callback)
注册一个回调,该回调会在路由导航过程中出错时被调用。注意被调用的错误必须是下列情形中的一种:
- 错误在一个路由守卫函数中被同步抛出。
- 错误在一个路由守卫函数中通过调用
next(err)的方式异步捕获并处理。 - 渲染一个路由的过程中,需要尝试解析一个异步组件时发生错误。